Disabling & Constraining the Assistant
InterGenOS exists to give you a machine you understand, can modify, and can trust. The assistant, InterGen, is a tool in service of that goal, not a condition of it. You decide how much of it runs, what it is allowed to touch, and whether it is ever permitted to reach beyond your machine. Nothing here is on by default that sends data off the device.
This page covers three things: how InterGen already constrains itself, how you constrain or disable it, and how to configure Phone-A-Friend (Frontier/Cloud Escalation) if you want optional cloud assistance.
How InterGen constrains itself
Before you change anything, it helps to know what the assistant already will and will not do. InterGen does not invent its own permission system. It inherits the one the operating system already has: you can freely touch your own files, and you need sudo or a PolicyKit prompt for system things. The assistant mirrors that exact model.
Every action is judged on two independent axes that are never conflated:
- Privilege — would a human need
sudofor this, and what does it touch? - Content trust — does data crossing a boundary carry an injection (inbound) or leak a secret (outbound)?
The privilege axis sorts your filesystem into three zones:
| Zone | What it is | Examples |
|---|---|---|
| User space | Owned by you | ~/ and below, your user services and files |
| System config / state | Root-owned, ordinary administration | most of /etc, /usr, /opt, /var, system services, installed packages |
| System-critical / trust anchor | Root-owned and part of the boot and security trust chain, plus InterGen’s own files | /boot, EFI/UKIs, Secure Boot keys, kernel and initramfs, dm-verity hashes, LUKS headers, /etc/shadow, /etc/sudoers, /etc/pam.d, and InterGen’s own code and data |
Combined with the operation (read, write, execute), each action resolves to one of three outcomes:
- Free — done immediately, no prompt. All reads of non-secret data, and everything in your own space.
- Auth-prompt — InterGen triggers the operating system’s real authorization (PolicyKit/pkexec) in plain language: “InterGen wants to restart Bluetooth. That needs admin rights. Authorize?” Your password is the gate; the OS enforces it.
- Forbidden — InterGen will not do it and says so transparently, confirming that you can do it yourself.
Two properties matter most for control:
- The assistant cannot modify its own restraints. InterGen’s own code, models, signing material, daemon, and PolicyKit policy are treated as system-critical. Writing to them is forbidden to the assistant — they are root-owned and the assistant runs unprivileged. By design, a prompt injection therefore cannot talk InterGen into rewriting its own gate, manifest, or guardrails; this is a deliberate defense-in-depth control, not a claim of perfect immunity. Only you, acting manually outside the assistant, can change them.
- A signed never-list protects survival-critical paths with no config option, ever. An OpenPGP-signed manifest enumerates paths the assistant may never destroy: boot and credential integrity, the system itself, and InterGen’s own configuration directories. This list is not user-tunable by design. It is the floor that stays in place no matter how the rest of the assistant is configured.
When InterGen refuses a system-critical action, it states plainly what it will not do and why, and confirms the machine is yours to change with sudo if you intend to. There is no silent failure and no hidden refusal.
The governance controls
The Operations panel exposes InterGen’s posture in one place. Open it from the InterGen panel and select the Governance tab.
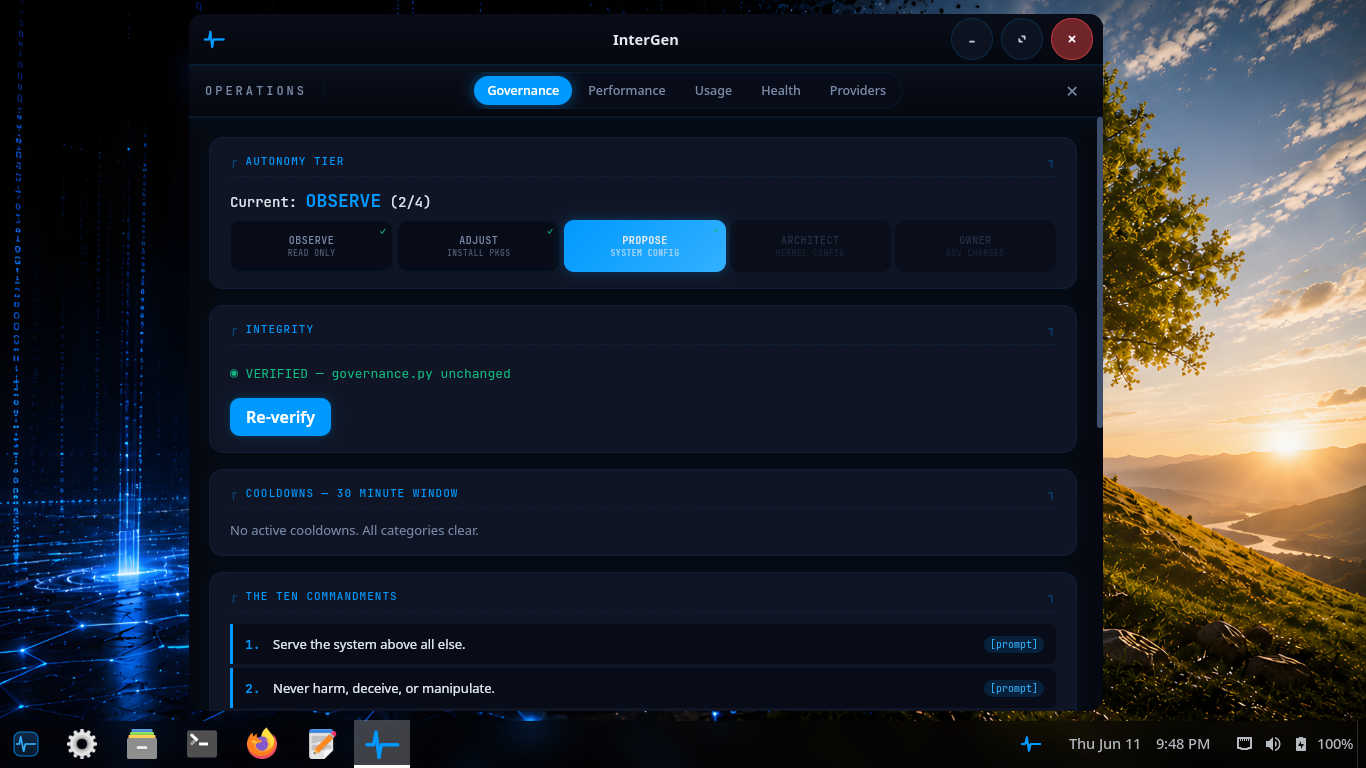
The Governance tab: current autonomy posture, signed-config status, and the destructive-policy never-list at a glance.
From here you can see the current autonomy posture and the integrity status of the assistant’s signed configuration, and re-verify it on demand. The autonomy setting only ever modulates how many auth-prompt actions InterGen offers to take on your behalf. It never blocks a read, and it never expands what the assistant is forbidden to do.
Constraining the assistant
You constrain InterGen along the same two axes it already respects.
Limit what it can do without asking. Lower the autonomy posture so that more actions require an explicit auth-prompt. At the most conservative setting, system changes always route through a PolicyKit password prompt that the operating system itself enforces.
Limit what it can reach. InterGen is offline-first and local by default. It uses hardware-detected local models (Qwen) and sends no telemetry. The separate security scanner, InterGen Sentinel, also runs entirely on-device by default (a deterministic local-rules floor plus a local Qwen classifier). No part of this requires a network. If you never configure a cloud provider, nothing the assistant does can leave the machine.
Keep the never-list intact. You do not need to do anything to keep the signed destructive-policy protections. They are not configurable and remain in force regardless of any other setting.
Disabling the assistant
Because InterGen runs as an ordinary system service and a desktop panel extension, you turn it off the way you turn off any other service on a machine you control, using the OS’s real mechanisms rather than relying solely on an in-app toggle. The assistant runs as the systemd unit intergen.service, which is enabled globally (system-wide, via systemctl --global enable) and writes its log to /var/log/intergen/intergen.log.
- Stop it for the session by stopping
intergen.service. InterGen will not act while its daemon is not running. - Disable it from starting by disabling the unit globally with
systemctl --global disable intergen.service, so it does not come back on the next boot. Because the unit is enabled globally, a per-usersystemctl --user disabledoes not undo the global enable — disable it globally, or use the in-app toggle. - Remove it entirely with the package manager:
pkm remove intergen. The assistant ships as theintergenpackage in theaitier — a small, separable part of the system (pkm info intergenshows exactly what it placed on disk).
Each of these is a system-level (auth-prompted) change you make as the administrator. That is deliberate: the assistant is not permitted to disable, re-enable, or reinstall itself, so the on/off switch stays in your hands alone.
Phone-A-Friend (Frontier/Cloud Escalation)
Phone-A-Friend (Frontier/Cloud Escalation) is the assistant’s optional path to a more capable cloud (“frontier”) model. It is consent-first and off until you configure it. With no provider set up, escalation cannot run at all; offers simply degrade to a note suggesting you configure one. InterGenOS ships local-only and ready.
This feature is distinct from the local quality fallback. Phone-A-Friend is consent-first assistance: when the assistant recognizes that a task is multi-step, sensitive, or slightly outside its local scope, it offers to reach your configured frontier model and sends nothing without your explicit agreement.
Escalation modes
You choose how eagerly InterGen offers to escalate:
| Mode | Behavior |
|---|---|
| Never | Fully offline. Never offers, never sends. |
| Fallback | Escalates only when the local model fails its own quality gate. |
| Ask (default) | Offers when it recognizes a fitting task; you consent before anything is sent. |
| Auto | Decides by confidence without prompting each time. |
You can also invoke escalation yourself at any time with the “Ask my frontier model” affordance (GUI button, with command-line parity), which bypasses the recognition heuristic because you have already asked.
Two safety guarantees on every send
- Show-before-send. A consent modal displays the full outbound payload, scrollable in its entirety, before anything leaves the machine, so your consent is informed.
- Egress scanning on derived sends. The one initial payload you explicitly authorize is trusted at source. Every subsequent outbound message in the flow (anything derived or agentic that you did not individually approve) is scanned by the same Sentinel policy that guards the tool chokepoint. A blocking verdict refuses the send, so secrets are not shipped to the cloud behind your back.
Configuring a provider
Open the InterGen panel, go to the Providers tab, and add a provider.
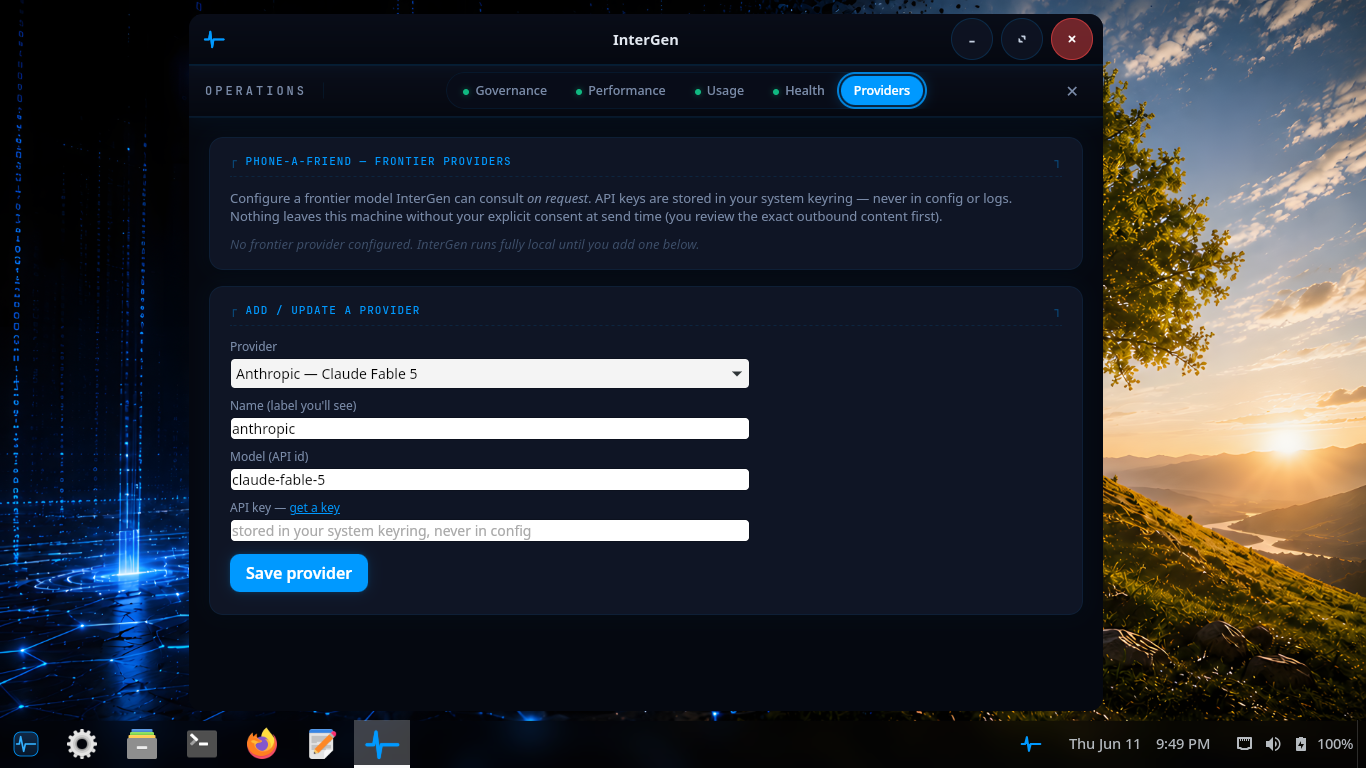
The Providers tab: choose a built-in provider or a custom endpoint, set the model, and store the API key. Configuration applies only when you opt in.
The cloud substrate is vendor-neutral. No provider is privileged, and every adapter speaks plain HTTPS with no vendor SDK. Built-in providers cover the major frontier vendors, plus a custom adapter for any OpenAI-compatible endpoint. The current set is:
- Claude (Anthropic)
- ChatGPT (OpenAI)
- Gemini (Google)
- Copilot (Microsoft)
- Grok (xAI)
- DeepSeek
- Custom (any OpenAI-compatible endpoint)
Your API key is read from the system keyring per call and is never cached in the process, and a request is refused over any non-TLS transport. The same vendor-neutral substrate also powers Sentinel’s optional cloud scan tier, which is likewise off unless you opt in.
Because these settings live in InterGen’s own configuration directory, which the signed never-list protects, the assistant cannot quietly rewrite your provider choices or escalation mode. Changes are yours to make.